
Having a feeding tube as a child can be super scary, and even adults can be a little worried too, especially with the reoccurring though of how to make sure everything is properly stored, tasty, and that their child is happy. While talking to my friend the other day over coffee, her little girl who has a G-tube ran over to me and proudly lifted up her shirt to show me her “accessories”, aka her G-tube pad, which just happened to be Hello Kitty that day. If you’re unsure of what I’m referring to, G-tube pads are cotton fabric pads that are designed to fit beneath your child’s G-tube, preventing any friction that could arise, and it protects the stoma!
Kids love these pads because they have their favorite superheroes, cartoons, animals, and princesses on them! Below are just several of the pads that my friend has for her daughter!

Now, if you’re like me and instantly took one look at these and thought to yourself, “how in the heck am I going to make these”, don’t be alarmed, because my friend has kindly given me a pattern and detailed instructions so that you guys can use to make all the G-tube pads that you would like!
Along with these super adorable G-tube pads, I have also found some other websites that have supplies for your child, like feeding tube backpacks, which are great to keep their G-tube and feeding bags in while they are playing!
For the winter months, or just the nightly bedtime routine, I have a tutorial for how to make footed pajamas for your child that has pockets perfect for G-tube access. All of these projects are very simple to make, and I am sure your child will love them just as much as you do!
How To Make a G-Tube Pad
Supplies:
- Flannel – cut to approximately 2 ¾ – 3” circles (2 for each pad)
- Terry Cloth or other absorbent fabric (cotton fleece, hemp, bamboo) and cut to the same measurement as the flannel. (1 for each pad)
- Snaps or Velcro
**Depending on the age and size of your child, the circles could be bigger!**
Instructions:
Step 1: Lay your flannel circles right side facing up and place the absorbent circles on top.

Step 2: Cut a slit through all 3 layers, straight up the middle of the circle about 2”. This may vary depending on the size you are making)
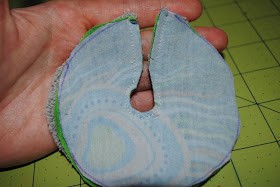
Step 3: Stitch the 3 layers together and around the slit you just made. BE SURE to snip the corners of your stitching on the edges of the slit so the pad will lay flat!
Turn the pad right sides out. This can be a finicky process, so take your time!

Step 4: Now that it’s turned right side out, it is time to stitch the layers together, so it is recommended that you pin the layers together when trying to sew it.
When you are sewing the outside, you can do a zigzag pattern around the edge to make it seem smoother and more neatly finished.
Once sewn, apply your snaps or Velcro!

How To Wash the G-Tube Pads
Now that you’ve made all of those cute G-tube pads, the real question is how are you going to clean and store them all! To ensure that these pads have a long lifetime, it is recommended to hand wash them, or wash them on a gentle cycle with cold water.
When storing them, this is how my friend keeps just a few of hers (She has over 30!) This is a super great and genius idea to have them hanging like this so they can dry evenly, and keep them from filing up all of your drawers!

Other G-Tube DIY Activities
If you are feeling adventurous, and want even more goodies for your child, feel free to check out these sources below that teach you how to make your own feeding tube backpacks and footed pajamas for bedtime!
If making your own backpack is not your cup of tea, there are many companies that sell these backpacks pre-made, along with other great essential accessories for both you and your family! Feeding Essentials is a great place to get Feeding Tube backpacks and “Line Tamers” which hold the IV, feeding, and monitoring tubes! Many of these items you can make yourself! I encourage that you step outside the box and see what you can create, and incorporate your whole family into the projects!
Do you have any feeding tube accessories that you or your kids love? Leave a comment below and tell us able!

2 thoughts on “DIY Tubie Accessories for Kids!”